This post may contain Amazon® product affiliate links. We may receive a commision if you make a purchase after clicking on one of these links but at no cost to you. Please visit Our Disclosure Page for more information. Thank you.
It’s never going to be the same as a 90 minute Swedish massage at your favourite health club. But the saying “little and often” applies to relaxation just as much as it does to food.
Preparing for a massage
You will be able to prepare to varying degrees based on where you are. In an ideal world you will be able to take a warm shower or bath and sit in a gently warm room with some peace and quiet or calm music. Remember to wash your hands if you will be touching your skin directly. However if you are at work in an office you may have less flexibility. If you can, sit away from your desk or at least turn your monitor off for a moment. Take a few deep breaths and clear your mind. That spreadsheet will still be there when you come back, nothing to worry about 🙂
Stop if anything hurts!
Neck & shoulder massage
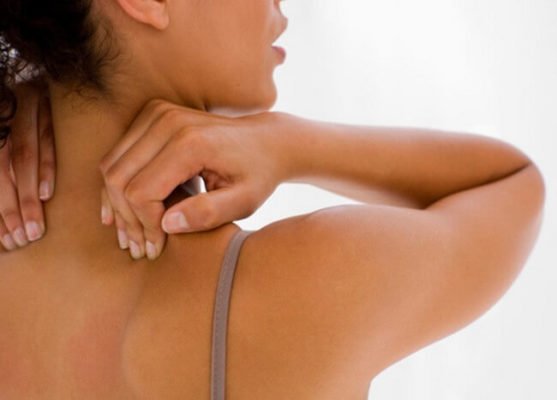 Lets start with massaging the neck & shoulders. You can do this through your clothes or onto your skin.
You can carry a lot of tension in this area, so it’s important not to jump straight in and try and force that pesky knot away. Remember to swap hands and do both sides!
Work with your left hand on your right shoulder (and vice versa) so at first, the palm of your hand is on your collar bone. Rest your fingers on the back of your traps and apply some gentle pressure by squeezing your hand. You should feel that you are roughly in the middle of this muscle and not be making too much contact with your shoulder blade for now. Press and release, increasing the pressure as you feel comfortable. Move your finger upwards, so as you apply pressure you are ‘pinching’ a smaller and smaller amount of the top of your shoulder, you may need to be more gentle with the very top of the muscle.
Now press directly downward with the flat part of your three main fingers, and while doing so move up to your neck and back down to the edge of your shoulder and back again. When you notice the palm of your hand is on your throat, switch the position of your arm to reach behind your head and grip the back of your neck. As before, press with the fingers – but this time working up and down the muscles to the opposing side of the spine.
After this, return to your previous squeezing position but this time hold your fingers down when you press and work in little circles, you shouldn’t be creating and friction, use the movement allowed by your skin.
This will feel really great, but it’s time to pay attention (although try not to lose your relaxed feeling) as this is a great space to find knotted muscle retaining tension. If you find a bit of your muscle that is tighter than the rest, experiment with applying more pressure to your circular pushing into the knot to release the tension.
Lastly, massage the side of the shoulder muscle and shoulder blade area. For the shoulder, put your two strongest fingers on the back of the opposing shoulder and use your palm to squeeze and create pressure, move up and down while applying/releasing pressure. Finally, move your hand up so it is once again on top of the shoulder and explore the small muscles along the ridges of your shoulder blade. How to proceed will be personal to you, place one or two fingers on whatever boney bit of the shoulder blade you can find then press deeper to get closer inward to the body. If this is comfortable, work your way along the bottom of the ridges and if you are cleaning and pushing the little knots hiding in there out of the side.
If you’re able to watch a video, take a look at this one from Judith Bourgeois. She’s got a load of great videos on her channel.
Hand massage
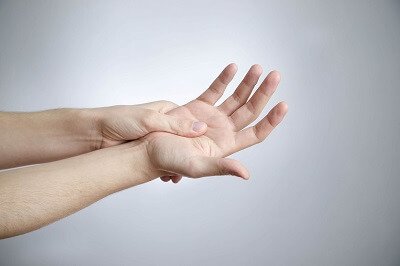
When massaging your hands, start first with your forearm and wrist. Place your thumb in the middle of the inside of your forearm, and fingers flat on the small muscle of the outside. Apply pressure from both sides, squeezing whilst rotating your hand slightly to provide a circular motion – making one small circle for each grip and release. Whilst doing this, move up your arm towards the elbow and then back down to your wrist.
Spend extra time on your wrist before starting to allow your thumb to move up and press on the lower part of the palm of your hand. As you press on your palm use more of the tip of your thumb to slide up the hand to your little finger. Do this a few times then vary the motion so you slide to meet the bottom of each finger, once per slide. For your thumb, apply as much pressure as is comfortable and make small circles.
Now hold onto your index finger by making a fist around it. Grip firmly, but loose enough the you can slide up the finger whilst maintaining the grip. Do this a few times, rotating the gripping hand as it slides up the finger. Repeat on each finger in turn and lastly do the same on your thumb. Now swap hands
Here’s a great instructional video. I like it so much, I’ve just stopped to watch and join in with the video again 🙂 You can do this anywhere! In the video they use a hand cream but it is not essential.
Massaging the arch of your foot
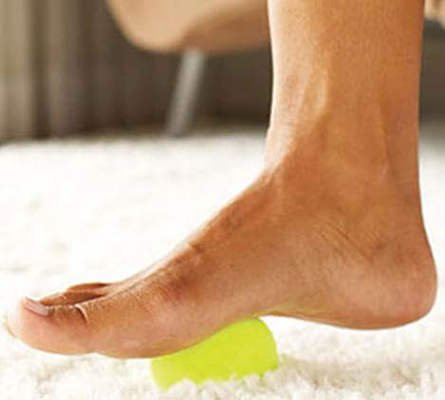
You can massage your foot with your hands, but many people are less keen to touch their feet whether it be because they are ticklish, or perhaps simply just don’t like feet! Also, we can press too hard with our hands and the sole of the foot can be delicate, so rolling our foot on an object is a great option for many reasons.
You’ll notice a tennis ball in the picture. This is the most common accessor amongst people I know, but you can use anything really. An unopened plastic water bottle, a rolling pin… there are also a number of commercial products available that are variants on the ball or tube shape.
If you don’t have great balance, consider sitting on a chair for this massage so you don’t accidentally apply too much pressure. Although standing is better should desire more pressure. You can try doing this gently whilst sitting, then standing up to continue if you like.
Place the ball (or other object) under your foot, and apply some pressure. Now, roll your foot very slowly back and forward. If you’re using a ball allow your foot to move sideways as well as back and forward. If you are using a straight object, experiment with leaving more of your weight on the outside, then on the inside of your foot.
https://www.youtube.com/watch?v=bV9E0V0ZeXg